Edit1 Overview
Payment tracking is an integral part of the XMS system. It essentially is a tracking tool that creates auditable records of payment transactions. Beyond that, XMS offers an interface for credit card transactions through the ViaWarp system.
Edit2 Payment Types
Edit2.1 Open Payments
Open payments are payments that have been entered into the system, but that have not been included into a deposit. As such, they are eligible for modification or deletion. Besides charge payments, these make up the bulk of payments in XMS. Initially, all new payment records are considered open payments, as their specifics have not been determined yet and their data has not been saved to the database.
Users can initiate new payments in two ways: directly from a registration, or from the main top menu. From a registration, click the Add New Payment button. This will open the payment screen. If there is a balance for the registration, the amount of the payment will be preset. This can be changed, if need be (partial payment). Make sure that all the payment data is correct and click Save Changes.
When selecting Credit Card as the payment method, additional input fields will appear. The Save Changes button will not work. When all credit card data has been entered, you must use the Charge Card Now button to process the charge through ViaWarp. XMS will let you know if the charge is declined. If it is accepted, the payment type changes from Open Payment to Charge Payment (see there for more information).
Edit2.2 Closed Payments
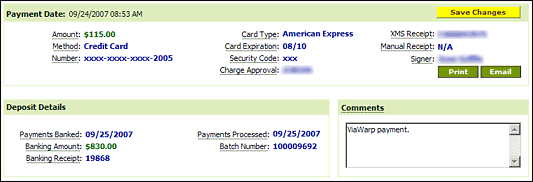
Closed payments are payments that have been processed for deposit and can no longer be modified in regards to their financial data. The only things that can be modified are the payor address data and the comments.
Edit2.3 Charge Payments
Charge payments apply to any saved credit card transaction records and can be of two types, settled or unsettled. When a charge or refund is successfully processed, the transaction is added to a settlement queue. This queue is settled daily at 10:00 PM. Until 10 minutes to 10:00 PM users have the chance to void the transaction, which is equivalent to deleting the payment from XMS. The transaction is removed from the settlement queue and the payment record is marked as deleted. After settlement the payment is closed and can no longer be modified, safe for the payor address data and comments.
 Edit
Edit3 Online Registration Payments
Go through the various online registration processing steps until you get to the Verify Payment screen,
Click the US Std button to format the payer’s address into US Post Office format, and the Mixed button to format into Title Case, in the event the data was entered in all CAPS or all lowercase. Make any other necessary formatting changes to the address. You have already formatted the student’s address during the Verify Student step. It seems like you are repeating the same thing here, but the address to format in the Verify Payment step, refers to the payer. In many cases the student and the payer are the same person, but sometimes a parent or employer pays for the student to attend.
Make sure that the Email confirmation to student box on the right side of the screen is checked.
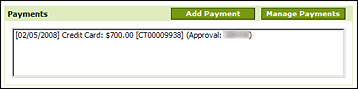
The bottom section of the screen, labeled Payments, displays the payment information. Click the Continue button. The commit screen will show the Commit Registration or Commit With ViaWarp buttons depending on the type of payment. If this is a charge payment, card will be charged immediately. In either case the registration will be completed.
A confirmation screen will appear with the registration results. Once payment has been applied to a registration, details are automatically entered into the Fees, Payments, and Totals sections of the student’s registration page.
Edit4 Manual Payments
When creating a new payment, select the payment method and fill in the following fields:
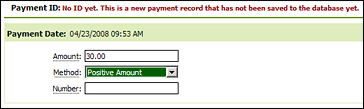
- Amount: may already be populated with whatever is owed on the registration.
- Number: a check or credit card number, if applicable.
- Payor address data: if need be.
Click the Save Changes button.
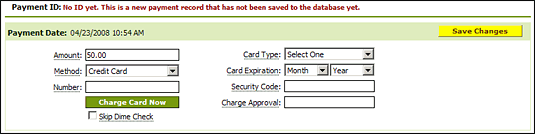
If this is a card payment, you'll also have to fill in these fields:
- Card Type: select Visa/MasterCard or American Express.
- Card Expiration: select the month and year of the expiration date.
- Security Code: for Visa/MasterCard the 3 digit code on the back of the card; for American Express the 4 digit code on the front of the card.
If this is a card refund, click the Refund Card Now button, otherwise click the Charge Card Now button..