Edit1 The Pending List
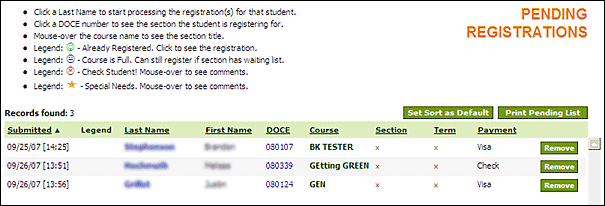
Users with permission to process online registrations will see a list of registrations that are pending processing. Students are, by default, sorted by the date and time they submitted their information, with the oldest submission at the top of the list. You are able to change the sort order by clicking any of the underlined column headers from
Last Name to
Payment if you need to do so.
The top portion of the page gives general instructions and shows a legend of symbols to alert you to something about the registration that needs attention. The symbols will appear in the
Legend column if the corresponding circumstance applies to the pending registration. Clicking the
Doce # link in the list will open the
Section in which the student is registering in a new window to provide the ability to quickly check the
Section information if needed. It will
not register the student.
 1.1 Setting a Default Sort
If you’d prefer your default to sort another way, by
Last name or
Doce #, etc. click on the corresponding column header to change it, once for ascending order
(a-z) twice for descending order
(z-a), then click the
Set Sort as Default button at the top right of the screen.
1.2 Printing the Pending List
Clicking the
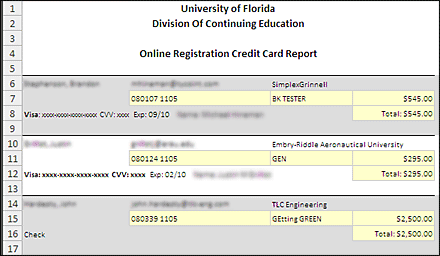
Print Pending List button at the top right side of the screen will generate a an
Excel (.xls) spreadsheet listing all pending registrations. This list can help in the registration process if you need to refer back to it for any information. The credit card numbers in the example below have been replaced with
xxxx-xxxx-xxxx-xxxx, however, they will appear normally in your report. For this reason do not store the printed pending list. Once you are finished with it, be sure to destroy it.
University security policies require that no credit card information can be stored in any retrievable form.XMS stores credit card numbers using strong encryption algorithms
only for a limited time for unprocessed online registration submissions. Once an online registration is processed, credit card numbers are truncated to their last 4 digits and CSV numbers are discarded.
All online registration payment pages and XMS itself run on a secure server, which means that all traffic between browser and the server is securely encrypted.
 Edit
Edit2 Online Registration Processing
When students register online through the various department's online registration pages, all registration data is collected in the XMS database in a special table. This data is then presented in the
Pending List. An online registration process is initiated by clicking the name of the student and goes through 4 steps:
- Verify Student
- Select Fees
- Verify Payment
- Commit Registration

After starting the process, each of these four steps is listed across the top of the screen, just below the main menu. The highlighted box indicates which step you are currently on.
2.1 Verifying the Student
In this step, you will need to search to see if the
Student already has a record in the database and also to confirm that the data entered is free from errors. This will be important later, when searching, updating or exporting
Student information from XMS. The left column on the screen shows the information the
Student has entered. The rightmost column shows the data that will ultimately be entered into the database. Corrections can be made in this column.
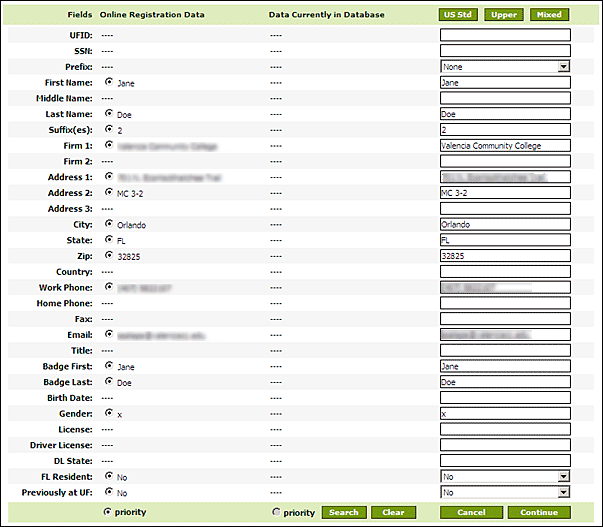
Three buttons allow automatic formatting. The
Mixed and
Upper buttons will change the case of the text entered. Click
Mixed if the registrant has typed in all lower case. Click
Upper if your department uses all upper case. Remember, the data when running reports will be extracted the same way it is entered. Entering information here in the manner you want it to appear in reports will save you time later. The
US Std button will format the address into
US Post Office Standard. It standardizes address abbreviations and directions, and phone and fax numbers to conform to the format: (xxx) xxx-xxxx This format is typically not used for international phone numbers.
It is important to ensure each
Student has only one record. When a large database is kept free from duplications, it is easier to maintain and simplifies the process of extracting information. When initiating the registration process, XMS automatically looks at the
SSN, UFID and
Drivers License fields to search for duplicates. If a student has entered data into these fields and XMS has found a match on an already existing record in the database, it will automatically display the results. Otherwise, click the
Search button at the bottom of the screen to check if student has previously registered for a course and has an existing record. A new window will open with a list of possible duplicate student records.
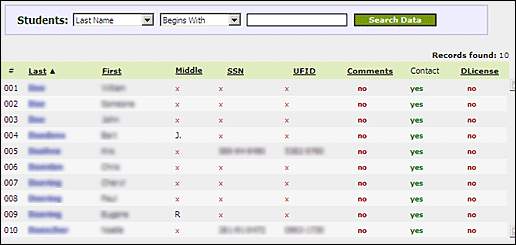
A common name like "Douglas" will likely bring up many possibilities and you will be able to narrow your search by either resorting the list or by using the search fields at the top of the screen. To narrow your search, you have a variety of search options. Each of the following options will help you find James Douglas. The more specific you are, the fewer results will appear.
Douglas, Ja
Doug, J
Dou, Ja
D, J
The records with contact information in them (and they all should) are indicated in the contact column by the word
yes. Hover your cursor over the word
yes in the contact column to see the
Student’s full contact information. You can compare the existing information with the new information entered.
If you find a match, click the name and XMS will automatically update the information on the
Student Verification screen. The third column shows the aggregate of the online submitted information and the information found in the database. As the most recently entered information is usually correct and up to date, priority is given to the online submitted data. You can designate the column to use by selecting the
priority radio button at the bottom of the column. Additionally, you can select individual entries and make further changes in the fields of the third column. What is shown in the third column is what is eventually entered into the database.
If no match was found, simply close the search window and click
Continue to go on to the next step.
2.2 Selecting Fees
In this step, you will select the Course Fees the student has indicated.
Match each Fee type in the Online Submitted Fees from the left side of the screen with the Available Course Fees on the right side of the screen. Either check the box or enter the quantities requested for each. Some of the choices ask for you to enter a quantity so that a total count can be calculated for each of these options.
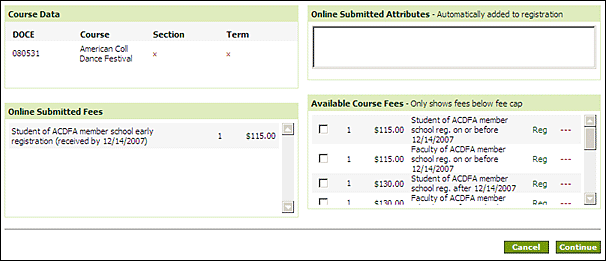
Click the Continue button at the bottom of the screen to go to the next step.
If the Fees do not match correctly you will get a warning message. If so, either click the Cancel button to return and correct your errors, or, if the mismatch is on purpose, select "Continue Anyway."
2.3 Verifying the Payment
If the student has used all lower case or made misspellings, correct those errors again here. The first time you fixed case errors, in the Verify Student step, was for the Student’s address, here it is for the Payor’s address, which may be a different.
Payments are processed differently depending on the method of payment chosen. XMS will set defaults accordingly.
- The "Email Confirmation to Student" is checked by default.
- If the Payor name is the same as that of the student, the payor is tagged as Participant.
- "Generate an Invoice" will be checked by default for all non credit card payments.
These defaults can be changed as necessary.
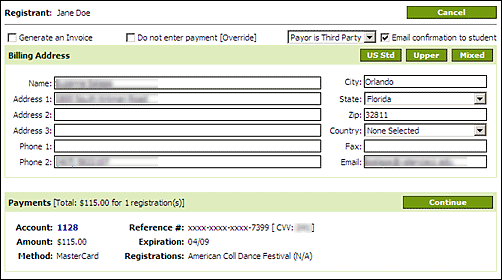
You can select to Override the payment, in which case the registration will be processed, but no payment will be entered. This may sometimes be needed when, for instance, there is something wrong with a payment, but the registration is time-sensitive. Payments can always be added to a registration later on. Please keep in mind, though, that any credit card payment information is lost when overriding and needs to be obtained from the payor again.
Click "Continue" to move to the final step in the process.
2.4 Committing the Registration
At this point nothing has been saved to the database yet and no cards have been charged. You can cancel this registration process by clicking the Home button to return to the Pending Online Registration list. Canceling will not remove the pending registration. Removing the pending registration entirely can only be done from the Pending Online Registration list.
Commit only if all information in the previous 3 steps was verified.
Registrations with a credit card payment will give you two options at this point. Commit with ViaWarp will use the automatic credit card processing system to charge the card. Regular Commit allows you to use a ZON terminal to charge the card and requires a charge approval code.


After commitment, XMS will show the results of the registration process. It will let you know whether a new student record was created or an existing one updated. If a credit card charge was declined, XMS will show you why and will terminate the pending registration process. Credit cards may be declined if the payer incorrectly entered the card number, expiration date, security code, or billing address. Contact the student to notify that his or her credit card was declined and to arrange another form of payment. Once you receive the correct payment information, register the student by overriding the credit card payment, then go into the student’s registration record to manually add their payment.
The result screen provides direct links to the student record, registration record and payment record. Once payment has been applied to a registration, details are automatically entered into the Fees, Payments, and Totals sections of the student’s registration page.
Click the Home button to return to the list of pending registrations or navigate to another part of XMS.
Edit3 Credit Cards Versus Debit Cards
Banks deal differently with VISA debit cards than they do with real credit cards, especially when a charge is declined. When a real credit card is declined, voiding the charge will remove the charge from the settlement queue and the charge is never processed. With debit cards the full charge amount is put on hold (pending) regardless of settlement or approval. Voiding the charge may take anywhere from 24 hours to 30 days. If a first charge is declined as the result of a typo in the CVV number and a second charge is approved, the payor will see two charges pending on his account until the voiding of the declined charge becomes effective. This can lead to all kinds of problems, especially with larger amounts of money.
To prevent large holds on declined debit cards, XMS first charges and voids a dime to check if the card is valid. If so, it then charges the full amount. This has no impact on real credit cards and the small percentage fee paid by DCE for each charge transaction is refunded in case of voidings, so the dime charge method has no financial impact for DCE or the payor. A message as to why a dime charge may temporarily show up on a debit card payor's account has been added to all online registration submission pages that take credit card payments.