Edit1 Reporting in XMS
Reports help extract data from XMS. Several templates have been pre-defined and are available from the main menu by selecting
Reports from the Top Menu and then the name of the report you’d like to run.
 Edit
Edit1.1 Reporting by Section(s)
Many reports will organize data about Sections. The method of creating the different reports is similar. It requires selecting the type of report you want to see, selecting the section on which you want to report and, in most cases, selecting the way you want the information to be outputted.
Activity Logs
Use Activity Logs when you want a comprehensive list of all payment activity for a section or range of sections.
Once you open
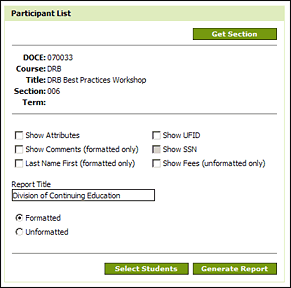
Reports → Activity Logs, you can either click the Get Section button to search for a specific section, or enter a DOCE number and Click the Get button to include all sections associated that DOCE number.
Once you get a section or range of sections, it will be displayed within the Activity Log window and each report you run until you log out. XMS will use the data from that section or range for all subsequent reports unless you get a different section.
There are three selections in which you can check a box to alter the data reported.
Make your selections and click the Generate Report button

The following reports follow the same methodology:
Certificates
This report exports the names of all registrants, sorted by last name, and other section information. It can be used as data in a merge document to generate completion certificates.
Fee Counts
This report shows which fees were applied for all registrations in a section, and how many.
Marketing Report
This report exports the brochure codes and marketing codes, as well as the total number of registrants for a section.
Name Tags
This report exports student names and as well as City/State and Company if you have selected it to do so. If more people were registered after you have printed name tags, you are able to only print those which have not been printed yet.
Online History
This report shows the online registration history for a particular section and time frame.
Participant List
This report exports all students registered to attend a section. Choose the data you want to export including Attributes, Comments, UFID, SSN and chose if you want the student last name to appear before the first name. Use the Select Students button to choose individual students to export. Select Formatted if you want to display the data in block format.
Select Unformatted to export the data into an Excel spreadsheet. This format can be used to prepare name tags, sign in sheets or any documents in which you’d like to design or format and use as a mail merge document.
Program Completion
Use this report to get a list of programs that have been completed for a particular section or range of sections. Select Replace pay reference with XXXX to mask check or PO numbers. Credit card numbers will not appear in reports because they are not stored in XMS. A summary will appear at the bottom of the report detailing total revenue for the section.
Registrar Enrollments
This report exports all students registered for credit courses.
Sign-in Sheets
This report generates a sign-in sheet for events. Select the amount of information you want to display on the sign-in sheet. Change the report title if necessary and click the Generate Report button. Once the report is generated, you are able to alter the parameters of the report by clicking ‘True’ on the corresponding radio button you want to display and ‘False’ on the ones you don’t want to display then click the View Report button. You can also select the format you want the report to display. Choose the format you desire then click Export.
Student Demographics
This report exports all student information plus race, nationality and the name of the User Group to which the record belongs. Select Formatted to display the information in one column. Select Unformatted to export the information into an excel spreadsheet.
Edit1.2 Reporting by Date (Range)

The following reports take a date or date range:
Invoice Log
This report will list all invoices generated on a given day or a series of days.
Receipt Log
This report will list all receipts generated on a given day or a series of days.
Summary of Sections
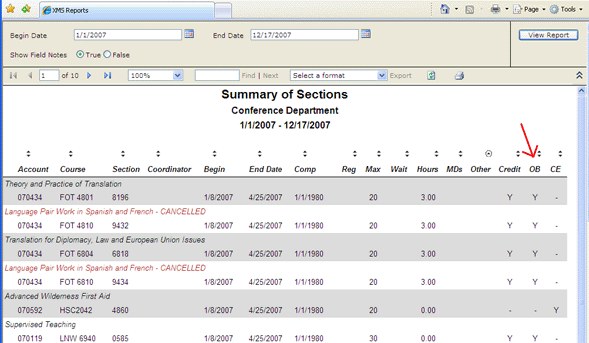
This report shows a summary on the sections included in the date range selected. Selecting Formatted will export a report in list format. Selecting Unformatted will export an Excel spreadsheet.
Tax Report
This report will detail the sales tax associated with the date of deposit included in the date range selected.
Term Report
This report provides an overview of the term entered.
1098T
This report generates Tuition Payments Statements, which colleges and universities are required to issue for the purpose of determining a student's eligibility for the Hope and Lifetime Learning education tax credits. More details on this follow in the next section.
Edit2 1098T Tax Reports for Self-funded Courses (off-book college credit courses)
After the end of each calendar year, UF's Student Financial Services (SFS) requests a report of the registration fees collected for self-funded college credit courses. UF combines this information with data from on-book sections so that 1098T forms may be sent to individual students for use on their income tax forms.
Each year SFS may change the required procedures, so follow all instructions in the email sent to you with the report request.
If you manage multiple XMS User Groups, you will need to follow these steps to produce a separate 1098T report for each User Group.
Edit2.1 Run the "Summary of Sections" report
Review the "Summary of Sections" report for the current, previous and future calendar years and make sure the self-funded college credit (off-book) sections for your user group are correctly indicated as "OB". Only those sections marked as "OB" will be included in the 1098T report.
If there are missing or incorrect sections, their designations may be edited via the
Sections page.
 Edit
Edit2.2 Run the 1098T report
Generate a 1098T report for the appropriate calendar year. This will combine the registration fees collected during that calendar by student across the entire XMS User Group. Please note that this is based on payment or refund date,
not the start date of the section itself.
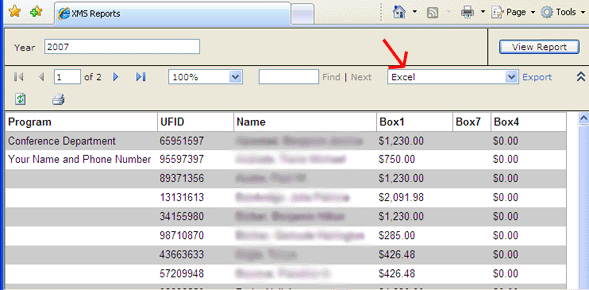
Review the report it to make sure there are UFID's for all students listed on the report. If any UFID's are missing you will need to enter them on the appropriate
Students page and then rerun the report.
Spot check the total dollar amounts for a few students to make sure the data is correct.
Finally, export the report in Excel format and fill in your name and phone number in the appropriate field.

Note: the names in the above image have been blurred for privacy purposes, the names will display clearly in the 1098T report that you run.
Edit2.3 Submit the 1098T report
Currently, SFS requires that your unit's Dean sign a separate form to acknowledge the veracity of the 1098T data. This additional form will need to be submitted to SFS, as well as the 1098T report, according to instructions specified in their request email.