Edit1 Overview
XMS is driven by its users and administrators. The basic access element in XMS is the
User Group.
User Groups are completely separated from each other and each have their own data, users and administrators.
Users have access to the data in their
User Groups in accordance with permissions set by the
User Group Administrators. The
Developers of XMS have a more extended control over
Users and
Administrators, as well as the application itself.
Within each
User Group the next access level consists of
Roles, which each have a set of permissions.
Users can quickly be assigned basic permissions by adding them to a particular
Role. Roles can be fine tuned through manipulating the
Permissions that are defined for the
User Group.
To allow
Developers and
Administrators to add, remove and modify
Users and
Roles, XMS has an interface that is tailored to their position.
Users never have access to any of the application's configuration or user administrative functions.
Edit2 Definitions
To understand how
User Administration works it is necessary to define its elements and clarify their functions. Within XMS there are three
Access Levels that have varying grades of permissions to manipulate
Users and the application.
Edit2.1 Developers
Developers are the application operators. This level is mainly meant to cope with anything that the
Users and/or
Administrators cannot handle themselves. This level is also responsible for the development and maintenance of the application and as such has full access to all
User Groups. Developers are the only ones that can add, remove and modify other
Developers and
User Groups.
Edit2.2 Group Admins
Group Admins are the second level of access in XMS. They can add, remove, or modify
Users within the
User Groups that they are
Admins for. Each
User Group usually has only one or two
Admins.
Edit2.3 Group Users
Users constitute the basic level of access in XMS. A
User can belong to multiple
User Groups, but can access and work in only one at a time. Access to XMS is determined by the
Role assigned to the
User by the
User Group Admin. Besides a
Standard Role, and extended
Roles that increase the standard permissions, there are two
Specific Roles that are restrictive to one particular task.
Edit2.3.1 Report Reader
Report Readers can only access a modified
Report section of XMS. They have no access to any other part of XMS. The
Report section allows them to pull
Reports for DOCE accounts that are allotted to them by the
User Group Admin. Both the number of various
Reports and the number of available DOCE accounts are limited to what a particular
Report Reader needs access to.
Edit2.3.2 Student Importers
Student Importers can only import
Student data into XMS. They cannot access any other XMS functionality. The data that can be imported is restricted to a certain format and is evaluated rigorously before being accepted. If any duplicate or incomplete
Student data is detected, the entire import is terminated until the issues are solved. The import is checked for possible hacks and other data inconsistencies as well.
Edit3 Roles and Permissions
Each
User Group has
Roles that define a particular level of access to XMS. XMS has a number of
System Roles that cover virtually all of its functionality, but if need be, customized
User Roles can be created on a per
User Group basis.
Roles define sets of
Permissions. Users added to a particular
Role inherit those
Permissions and can use XMS accordingly. The various
Roles and
Permissions are as follows:
Edit3.1 System Roles
XMS has a set of
Roles that are inherent to the application and cannot be changed by
Admins. These
Roles cover all the basic functionality in XMS.
The
User Group Administrator.
Extends the
Standard Role with permission to process
Payments for
Deposit.
The XMS
Developer.
Extends the
Standard Role with permission to process
Registrations that were submitted online.
Has access to a limited number of DOCE accounts only for the purpose of generation a limited number of
Reports. Has no other access rights to XMS. This
Role is usually reserved for persons outside of the
DCE Staff circle that need information about
Section participation and other basic course data.
The standard
Role for XMS access, which allows the
User to work with
Registrations, Courses, Sections, Students, Contacts, Payments, Mailing Lists, Locations, Programs, and
Reports. Access to
Deposits and
Online Registrations requires membership of the
Depositor and
OnlineRegistrator Roles in addition to this
Role.
Has a limited ability to import
Student data into XMS in accordance with stringent data format requirements. Has no other access rights to XMS.
When new
Users are added to XMS by either a
Developer or
Admin, they are added to the
Standard Role by default. Further access or access restrictions need to be handled after the
User has been added. In most cases the
Standard Role or changing to the
Report Reader Role will suffice.
Edit3.2 User Roles
User Roles are specific
Roles defined by the
User Group Admin for access permissions that are not covered by the
System Roles. Since the
System Roles do cover virtually all XMS functionality, there are currently no such
Roles defined.
Edit3.3 Permissions
XMS has a basic set of
Permissions that are used within the Roles to create a particular form of access.
- XMS_BackflowUser: Provides access to Backflow data.
- XMS_Courses: Provides access to XMS Course records.
- XMS_Deposits: Provides access to Deposit data and the ability to process Payments for Deposit.
- XMS_LandfillUser: Provides access to Landfill data.
- XMS_MailingLists: Provides access to Mailing Lists.
- XMS_OnlineReg: Provides access to Online Registrations records and the ability to process these.
- XMS_Payments: Provides access to Payment records.
- XMS_Registrations: Provides access to Registration records.
- XMS_Reports: Provides access to Report generation.
- XMS_Sections: Provides access to Section records.
- XMS_Students: Provides access to Student records.
Each
Role consists of a combination of one or more of these
Permissions.
Edit4 Administration
The actual administration of
Users and
Roles is handled through the XMS interface. Both
Developers and
User Group Admins have an extra
Menu item called
Administration. Since the administrative abilities of
Developers go beyond the scope of this help file, we will only deal with the
Menu as it appears to
User Group Admins.
For
Admins there are three
Menu items with specific functions.
Edit4.1 Members
Here,
Admins can add, remove, or modify
Users for the particular
User Group they are administring.
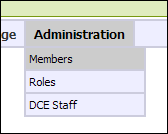
From the
Top Menu, select
Administration → Members to bring up a listing of current
Users.
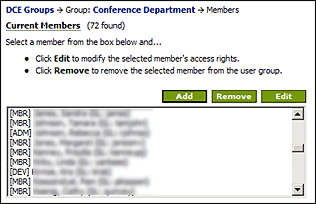
To add a new
User, click the
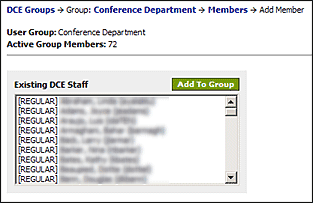
Add button. This will bring up a list of active
DCE Staff Members that are not already
Users for this
User Group. If the
User you want to add is not in this list, it means that they have not been entered into the
DCE Staff database. You must do so before you can add the
User to your
User Group (see section 4.3 below for information on how to do this). If the
User is in the list, select him and click the
Add To Group button. The
User will be added to the
User Group with the
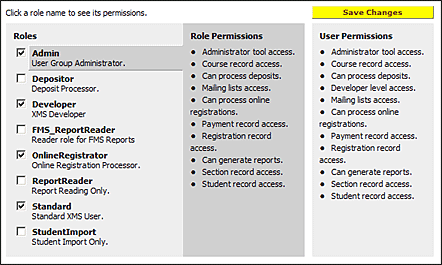
Standard Role Permissions and you will see a screen where you can fine tune or change the access for the
User.
For instance, if the
User should be a
Report Reader, uncheck the
Standard Role (and any other checked
Roles), check the
Report Reader Role and click the
Save Changes button. When selecting
Report Reader or
Student Import, make sure that no other
Roles are selected.
If a
User is a
Report Reader, you can further restrict acess by selecting what
DOCE Accounts are available to the
User. By default the
User has access to all accounts in the
User Group. See section 5 for more information about account restrictions.
To remove a
User, select the
User from the
User List and click the
Remove button. This will remove the
User from both the
User Group and any associated
Roles.
To modify the access rights of a
User, select the
User from the
User List and click the
Edit button. You will be taken to a screen where you can determine what
Role the
User should be assigned to.
 Edit
Edit4.2 Roles
Here,
Admins can add, remove, or modify
User Roles for the particular
User Group they are administring.
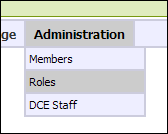
From the
Top Menu, select
Administration → Roles to bring up a listing of current
Roles defined for the
User Group. In almost all cases this will be a list of
System Roles only.
System Roles cannot be added, removed or modified by
Admins.
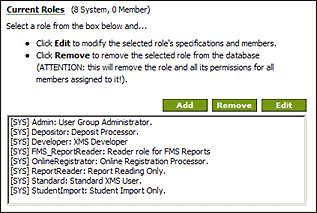
To add a new User Role, click the Add button. Enter the Role Name and Description and select what Permissions apply to this Role. Please check your set of Permissions against the Permission sets defined for the existing System Roles. If your set matches those of an existing System Role there is little use in creating a duplicate as a User Role. Instead, simply assign the User to the System Role. Click the Save Changes button to create the User Role.
To remove a User Role, select the Role from the Role List and click the Remove button. This will remove the Role from the User Group and any User associations.
To modify a User Role, select the Role from the Role List and click the Edit button. Change whatever information needs to change and click the Save Changes button. Here too, if the Permission set changes, check it against those of the System Roles.
Edit4.3 DCE Staff
From the
Top Menu, select
Administration → DCE Staff to bring up a listing of Active DCE Staff members. In order to add a new User to your User Group, they must be present in this list.
If they are not, clcik the Add New DCE Staff Member button. The minimum requirements for successfully adding a new record are:
- First Name: The first name of the User.
- Last Name: The last name of the User.
- UFID: The UFID of the User.
- Primary Group: The User Group that the User is primarily associated with. Remember, a User can belong to more than one User Group.
- Default Group: The User Group a User will start off in after logging into XMS. If the User is only associated with one User Group, set this to the same as the Primary Group. If the User is associated with more than one User Group, this would ideally be set to the Group they work with most (which is not necessarily their Primary Group).
- Active: Should always be set to Yes.
- Gatorlink Name: The GatorLink user name. This is required to log into XMS, as XMS uses GatorLink authentication. If the User does not hav a GatorLink account, they can still be added to the DCE Staff Member list, but cannot log into XMS until a valid GatorLink user name has been added to this record.
The rest of the fields are optional, but we recommend that they be filled in as completely as possible. Click the Save Chenges button when done to add the record to the DCE Staff Member list.
You can now add this member to a User Group that you are an Admin for and set his Permissions accordingly.
Edit5 Account Restrictions
Especially those User Groups that have many DOCE Accounts would not want their ReportReaders to have access to all of them. It causes confusion and may lead to data falling into the wrong hands. It is best practice to restrict ReportReaders to only those DOCE Accounts that they absolutely need access to to do their job.
The default in XMS is no restriction. To restrict a ReportReader to one or more DOCE Accounts, go to their Member record and select the accounts from the list of available DOCE Accounts. This list shows both open and closed accounts -- the open accounts firs, and then the closed accounts. In other wordsa, you can provide access to closed accounts as well. Actuate the restriction by clicking the Right Arrow button. This will move the selected accounts over to the restriction list. There is no need to click the Save Changes button.