Edit1 Creating a New Course
From the
Top Menu, select
Registration → New Course.
As mentioned, this is a new
Course record that has not been saved to the database yet. The minimum requirement for a new
Course to be saved to the database is that it has a
Name and a
Title.
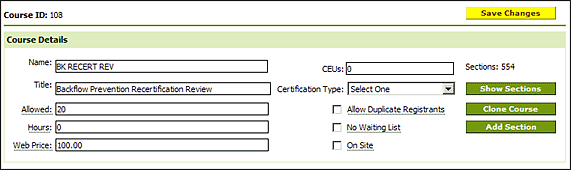
Fill in the following fields:
- Name: A short unique label for the Course, such as an abbreviations or acronym, such as ACASA.
- Title: A longer, full title of the Course, such as 14th ACASA Triennial Conference 2007.
- Allowed: The maximum number of students allowed to register.
- Hours: The number of credit hours earned for completing the Course.
- Web Price: The cost to the department organizing the Course.
- CEUs: The number of Continuing Education Units earned for attending this Course.
- Certification Type: If applicable, choose whether this is an initial or a refresher Course.
- Allow Duplicate Registrants: Check if you want to allow student’s to register more than once.
- No Waiting List: Check if you do not want to allow registrants on a waiting list.
- On Site: Check if the Course will be held on the site of the client, rather than in your department’s facility.
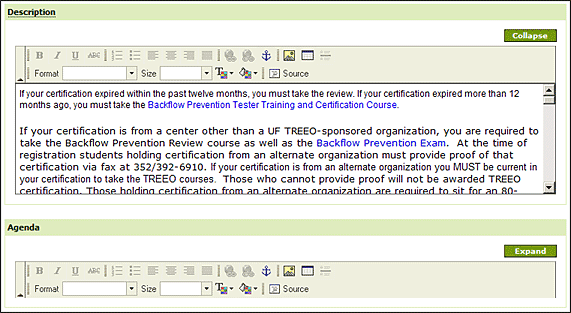
- Description: Enter detailed information about the course, which typically will appear on the registration web page.
- Agenda: A list of items or points to be covered within the course, which typically will appear on the registration web page. Notice that this field also allows you to format the text.
The above two fields allow formatting of their content. You can change fonts, colors, and layout. To preserve space, the fields are collapsed by default. To make them larger, click the
Expand button.
- Comments: Enter any miscellaneous notes about the Course which only other XMS users will see.
At this point, click on the
Save Changes button to save your data and create the
Course. A
Course ID will be automatically assigned as a unique numeric identifier for this
Course.
Edit2 Managing Course Details
Once you have saved the
Course, the fields at the bottom half of the screen become available. To add information to any of these fields, click on the corresponding
Manage ... button.
 Edit
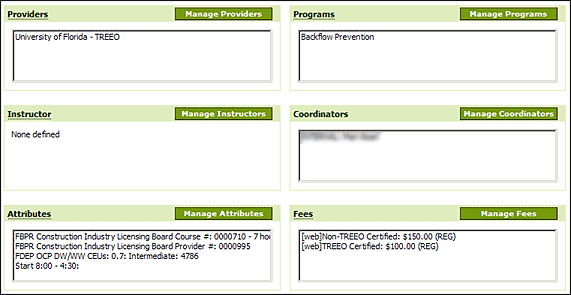
Edit2.1 Providers
Provider refers to the institution providing this
Course. This is a pull down menu and is not used by all departments. If you're shown the statement
"No records found for this course," it means your department does not have specific
Course Providers besides the department itself.
Edit2.2 Programs
Lists the
Programs with which this course is associated. This is a pull down menu and is not used by all departments. If you're shown the statement
"No records found for this course," it means your department does not have specific
Programs.
Edit2.3 Instructors
The name of the primary teacher or developer of the
Course. For now, only one instructor can be entered at the
Course level. Multiple instructors can be added at the
Section level.
Edit2.4 Coordinators
The names of the
Internal and
External Coordinators for the
Course. Courses take only one of each.
Edit2.5 Attributes
Open text fields where you can note special equipment needed for the
Course or other special information. These fields take the format of key/item name and a value.
Edit2.6 Fees
The
Fees associated with the
Course. When adding new
Fees, click on the
Add a Fee button. A new row will appear allowing you to enter information into the following fields:
- Sequence: The order in which you want the Fees to be listed on the registration website. They will not be listed in the order they are entered here. It is possible to use decimals.
- Description: A description of the Fee to indicate how it differs from the other Fees listed.
- Amount: The amount of the Fee.
- Taxable: Check if the Fee is taxable
- Reg: Check if the Fee is a required Registration Fee. Only registrations with at least one required Registration Fee count as valid registrations and show up as such in reports. If a Registration Fee is omitted, the registrant will appear as a Guest in reports.
When you are finished, click the
Save Changes button. The
Remove button allows you to delete a
Fee.
Edit3 Adding a Section to a Course
At the
Course to which you want to add a
Section, click the
Add Section button on the right top of the screen. A new, unsaved
Section shows up with all information that proagates from the
Course already filled in.
From here on, the process is the same as for
Managing Section Details.
Edit4 Cloning a Course
At the
Course you want to clone, click the
Clone Course button on the right top of the screen. A new, unsaved
Course shows up with all non-unique information proagated from the original
Course already filled in.
Edit5 Listing Associated Sections
The top right of the screen shows the number of
Sections associated with this
Course. To list these
Sections, click the
Show Sections button.